
Implementing the Clickable Progress Bar in Web form in CrmPortals/PowerApps Portals
Summary : Implementing the Clickable Progress Bar in Web form in CrmPortals.
copy the following code and paste in the Javascript field in web page which is your webform associated
Code:
// JavaScript source code
$(document).ready(function () {
applicationNavigationForm();
});
function applicationNavigationForm() {
var i = 1;
$("#WebFormControl_ProgressIndicator ol.progress li").each(function () {
var content = this.innerHTML
if (!$(this).hasClass('active')) {
var link = $('<a>').attr({
href: '#',
title: content,
onclick: 'someFunction(this)',
id: i
}).html(content);
this.innerHTML = "";
$(this).append(link);
}
else if ($(this).hasClass('active')) {
var link = $('<div>').attr({
title: content,
id: i
}).html(content);
this.innerHTML = "";
$(this).append(link);
localStorage.setItem("CurrentStage", i);
$("#WebFormControl_ProgressIndicator ol.progress li a").removeAttr("href");
$("#WebFormControl_ProgressIndicator ol.progress li a").unbind("click");
}
i++;
var stepName = content;
if (stepName != undefined) {
stepName = stepName.replace('<span class="glyphicon glyphicon-ok"></span>', '');
}
});
if (localStorage.getItem("ClickedStage") != undefined && localStorage.getItem("CurrentStage") != undefined) {
if (parseInt(localStorage.getItem("ClickedStage")) == parseInt(localStorage.getItem("CurrentStage"))) {
localStorage.setItem("ClickedStage", null);
localStorage.setItem("CurrentStage", null);
}
else if (parseInt(localStorage.getItem("ClickedStage")) < parseInt(localStorage.getItem("CurrentStage"))) {
$('#PreviousButton').click();
}
else if (parseInt(localStorage.getItem("ClickedStage")) > parseInt(localStorage.getItem("CurrentStage"))) {
$('#NextButton').click();
}
}
}
function someFunction(obj) {
localStorage.setItem("ClickedStage", $(obj).attr('id'));
localStorage.setItem("CurrentStage", $("#WebFormControl_ProgressIndicator ol.progress li div").attr('id'));
var nextButton = $('#NextButton');
if ($("#NextButton").is(":disabled")) {
$('#PreviousButton').click();
}
else if ($(obj).parent().hasClass('text-muted list-group-item-success')) {
$('#PreviousButton').click();
}
else if ($(obj).parent().hasClass('incomplete')) {
nextButton.click();
}
}
How to Validate Text fields allow only Numbers Dynamics 365 Portals.
Summary: How to Validate Text fields allow only Numbers Dynamics 365 Portals.
$(document).ready(function(){
$("#name").keyup(function(event) {
if ( event.keyCode == 46 || event.keyCode == 8 ) {
// let it happen, don't do anything
} else if (/\D/g.test(this.value)) {
// Filter non-digits from input value.
this.value = this.value.replace(/\D/g, '');
alert("Enter only Numbers");
}
});
});
How to Develop Sticky Footer in Microsoft Dynamics 365 CRM Portals.
Summary : How to make the Sticky Footer in Microsoft Dynamics 365 CRM Portals.
1. Navigate to Portals Tab---> Webtemplates
2. Open the Footer webtemplate and search for the following line of code
<footer role="contentinfo">
3. Replace the above line with following code.
<footer role="contentinfo" style="position:fixed;left:0;bottom:0;width:100%;">
How to Disable / Enable the Fields, Buttons and DateTime Fields with Common Code. In Dynamics 365 CRM Portals.
Summary : How to Disable / Enable the Fields, Buttons and DateTime Fields In Dynamics 365 CRM Portals.
Common Code:
function TextFieldsdisableEnable(fields, flag) {
if (fields !== "") {
var fieldschema = fields.split(",");
for (var item = 0; item < fieldschema.length; item++) {
if (fieldschema !== "" && $("#" + fieldschema[item]) !== null) {
$("#" + fieldschema[item]).prop('disabled', flag);
}
}
}
}
function DatetimeFieldsdisableEnable(fields, flag) {
if (fields !== "") {
var fieldschema = fields.split(",");
for (var item = 0; item < fieldschema.length; item++) {
if (fieldschema !== "" && $("#" + fieldschema[item]) !== null) {
if (flag) {
var dateField = $("#" + fieldschema[item]);
// Get ‘Text’ field of Date Control
var displayField = dateField.nextAll(".datetimepicker").children("input");
// Get ‘Calendar’ Icon of Date Control
var dateIcon = dateField.nextAll(".datetimepicker").children("span");
// Make ‘Text’ field of Date Control Read-Only
displayField.attr("readonly", "readonly");
// Hide ‘Calendar’ Icon
dateIcon.css("display", "none");
}
else {
var dateField = $("#" + fieldschema[item]);
// Get ‘Text’ field of Date Control
var displayField = dateField.nextAll(".datetimepicker").children("input");
// Get ‘Calendar’ Icon of Date Control
var dateIcon = dateField.nextAll(".datetimepicker").children("span");
// Make ‘Text’ field of Date Control Read-Only
//displayField.attr("enabled", "enabled");
displayField.removeAttr("readonly");
// Hide ‘Calendar’ Icon
dateIcon.css("display", "");
}
}
}
}
}
How to Use Example:
// the first parameter is list of fields/button id's which you want to disable and second parameter pass true/false , true for disable and false for enable.
TextFieldsdisableEnable("portal_test,portal_tetsoptionset,edittBtn", true);
DatetimeFieldsdisableEnable("portal_testdate", true);
How to Create Custom Button in CRM Portals EntityForm or WebForm
Summary : How to Create Custom Button in CRM Portals EntityForm or WebForm
Code:
$(document).ready(function () {
var editbtn = $('<input/>').attr({ type: 'button', name: 'Edit', value: 'Edit', id: 'edittBtn', class: 'submit-btn btn btn-primary' });
// InsertButton is for the Create Form, if you want for update form use the UpdateButton
$("#InsertButton").after(editbtn);
$("#edittBtn").click(function () {
// Implement the button click logic.
});
});
How to auto populate the Customer/Account field from current login user's customer in Dynamics 365 Portals
Summary : How to auto populate the Customer/Account field from current login user's customer in Dynamics 365 Portals
Open your EntityForm or WebForm Step and place the following code on advanced JavaScript field.
Code:
$(document).ready(function () {
{% if user %}
$("#customerid").val('{{user.parentcustomerid.id}}');
$("#customerid_name").val('{{user.parentcustomerid.name}}');
$("#customerid_entityname").val("account");
{% endif %}
});
In the above code replace customerid field with your field schema name and {{user.parentcustomerid.id}} replace with you field name of user entity.
ex: {{user.yourfieldname.id}}
Enabling Maintenance Mode – CRM Portals
Summary : Enabling Maintenance Mode – CRM Portals
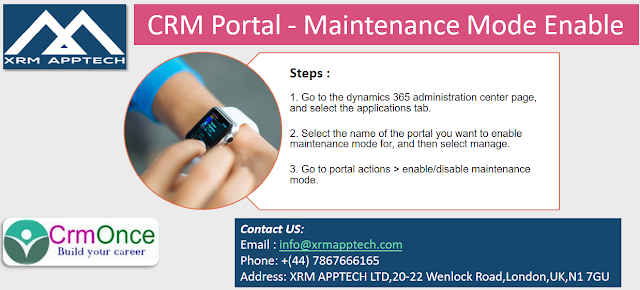
When our website is scheduled for maintenance or is down due to temporary outage.
When a customer accesses the website during maintenance, unpredictable behavior and intermittent unavailability might be experienced.
As a portal administrator, we can configure our portal to display a proper message to customers whenever a maintenance activity is going on.
Ex:
1. Solution packages are being upgraded
2. Deployments and upgrades

Field Service WorkOrder Life Cycle in Dynamics 365 CRM
WorkOrder Life Cycle in Dynamics 365 CRM:
A work order in dynamics 365 for field service has data on what work has to be done.
It's used to coordinate and schedule resources and activities.
It will be used for various styles of work, like installations, repairs, or preventive maintenance.
A work order is typically created from a case or opportunity. It is then scheduled either manually or using the schedule assistant and then dispatched. Once the work is complete, it's reviewed and approved by a manager.
Work order creation: A work order is created, usually from a case or opportunity
schedule: the work order is then scheduled.
Dispatch: the work order is dispatched.
Service: the work order is performed and details are updated.
Review/approval: the work order is reviewed and approved by a supervisor.
Invoice and inventory adjustment: inventory adjustments are made and an invoice is generated for the corresponding account.

Video :
A
Resco Mobile Dynamics 365 CRM APP Development Training
Subject : Resco Mobile Dynamics 365 CRM APP Development Training
Course Content:
- Introduction to Resco Mobile CRM
- Resco app
- Woodford
- Security
- Mobile Projects
- RESCO CRM Sync
- Creating a Customization
- Fields
- Views
- Rowscripts
- Search columns
- Charts
- Forms
- Dashboards
- Branding
- Entity hubs
- Process flows
- Auditing in Resco
- Business Rules

Dynamics 365 CRM V9.0 Quiz
Summary : Quiz Program from CRMOnce & XRMAPPTECH.
You can refresh your Dynamics 365 CRM skill by taking the Quiz

You can refresh your Dynamics 365 CRM skill by taking the Quiz

Dynamics 365 CRM Plugins Code Sample for Practice
Summary : Dynamics 365 CRM Plugins Code Sample for Practice
All we have started code samples for plugins you can download from the following link.
https://crmoncee.sharepoint.com/:f:/s/academic/EooJQ3KamatDo6HkjvaU9MQB8m-excku_dV4PolENH1EIQ?e=egxeIY
If you need any implementation help or Support. get in touch with us.
All we have started code samples for plugins you can download from the following link.
https://crmoncee.sharepoint.com/:f:/s/academic/EooJQ3KamatDo6HkjvaU9MQB8m-excku_dV4PolENH1EIQ?e=egxeIY
Contact US:
Email : info@crmonce.com
Phone: +91 9493916112
Skype for Business: umamahesh@crmonce.com
Dynamics 365 CRM Integrations Training & Support
Summary : Dynamics 365 CRM Integrations Training & Support
In this course we teach you about the integrations and basics of azure, Data Migration.
High Level Topics will be covered:
1. Azure trail setup & resource groups, subscription.
2. Azure Logic Apps, App services.
3. Developing the custom WebApi and deploying.
4. Azure Functions, Service bus, Azure Blob storage.
5. Consuming Webapi’s in Plugins.
6. Setup azure sql server, VM’s.

Pluralsight Weekend offer - 8th March to 10th March 2019
The pluralsight is one of the best site to learn the new technologies videos courses.
This website is giving free weekend offer to utilize this offer click on the below link and signup.
https://learn.pluralsight.com/offers/2019/free-weekend

You can download the videos using the chrome add-on video down loader.
How to Restrict the deleting a record in Dynamics 365 Plugin
Summary: How to Restrict the deleting a record in Dynamics 365 Plugin
using System;
using System.Collections.Generic;
using System.Linq;
using System.Text;
using System.Threading.Tasks;
using Microsoft.Xrm.Sdk;
using System.ServiceModel;
using Microsoft.Xrm.Sdk.Query;
namespace Opportunity1
{
public class OpportunityPreDelete : IPlugin
{
public void Execute(IServiceProvider serviceProvider)
{
// Obtain the execution context from the service provider.
IPluginExecutionContext context = (IPluginExecutionContext)serviceProvider.GetService(typeof(IPluginExecutionContext));
// Obtain the organization service reference.
IOrganizationServiceFactory factory = (IOrganizationServiceFactory)serviceProvider.GetService(typeof(IOrganizationServiceFactory));
IOrganizationService service = factory.CreateOrganizationService(context.UserId);
if (context.InputParameters.Contains("Target") && (context.InputParameters["Target"] is EntityReference))
{
if (context.MessageName == "Delete")
{
throw new InvalidPluginExecutionException("opportunity deletion not allowed");
}
}
}
}
}
If you need any implementation help or Support. get in touch with us.
using System;
using System.Collections.Generic;
using System.Linq;
using System.Text;
using System.Threading.Tasks;
using Microsoft.Xrm.Sdk;
using System.ServiceModel;
using Microsoft.Xrm.Sdk.Query;
namespace Opportunity1
{
public class OpportunityPreDelete : IPlugin
{
public void Execute(IServiceProvider serviceProvider)
{
// Obtain the execution context from the service provider.
IPluginExecutionContext context = (IPluginExecutionContext)serviceProvider.GetService(typeof(IPluginExecutionContext));
// Obtain the organization service reference.
IOrganizationServiceFactory factory = (IOrganizationServiceFactory)serviceProvider.GetService(typeof(IOrganizationServiceFactory));
IOrganizationService service = factory.CreateOrganizationService(context.UserId);
if (context.InputParameters.Contains("Target") && (context.InputParameters["Target"] is EntityReference))
{
if (context.MessageName == "Delete")
{
throw new InvalidPluginExecutionException("opportunity deletion not allowed");
}
}
}
}
}
Contact US:
Email : info@crmonce.com
Phone: +91 9493916112
Skype for Business: umamahesh@crmonce.com
How to create a LogicAPP from azure portal for Dynamics 365 CRM and Twit...
Contact US:
Email : info@crmonce.com
Phone: +91 9493916112
Skype for Business: umamahesh@crmonce.com
What is a Azure Logic Apps
Summary : Azure Logic Apps Introduction
Some scenarios we can automate the with logic apps:
If you need any implementation help or Support. get in touch with us.
Azure Logic Apps is a cloud service that allows you to automate
business processes and tasks.
Logic Apps simplifies the design and development of scalable
solutions for application integration, data integration, system integration,
enterprise application integration (EAI) and business-to-business (B2B)
communication, whether in the cloud, on site or on both sides.
Some scenarios we can automate the with logic apps:
·
Send Office 365 email notifications when events occur in different systems, apps and services.
•
Move uploaded files to Azure Storage from an SFTP or FTP server.
•
Monitor tweets for a particular topic, analyze feelings and create alerts or tasks for items that need to be reviewed.
Azure Logic Apps having a growing gallery with 200+ connectors, which include services such as Azure Service Bus, Functions, and
Storage; SQL, Office 365, Dynamics, Salesforce, BizTalk, SAP, Oracle DB, file
shares, and more.
·
Managed connectors: logic apps need access to data, services, and systems. Use
prebuilt Microsoft-managed connectors that are designed to connect, access, and
work with your data.
·
Triggers: Connectors provide
triggers that fire when events or new data meet specified conditions
·
Actions: Actions are all the
steps that happen after the trigger. Each action usually maps to an operation
that's defined by a managed connector, custom API, or custom connector.
Contact
US:
Email : info@crmonce.com
Phone: +91 9493916112
Skype for Business: umamahesh@crmonce.com

Subscribe to:
Comments (Atom)
Popular Posts
-
CRMOnce: Dynamics 365 CRM Training Course Content - Hyderabad,Chennai,Banglore,Pune Content: Microsoft Dynamics CRM is all about Cus...
-
ms crm 2011 developer jobs with Harjai Computers Pvt Ltd., Noida. We are an ISO 9001 : 2008 IT Out Sourcing company currently providing I...
-
Summary: Dynamics CRM Developer- Louisville, KY - $115K Great Culture! Dynamics CRM End user in the process of m...
-
Summary: Very Immediate Opportunit y for "Senior MSCRM Technical Consultant " with CMM L5 Client We are looking for a MS Dy...
-
Greetings From HEMAC !!!! We are looking for immediate joinees for Dot Net Developer- Hyderabad: Skill Requirement .Net Developer: 1. So...

Contact US
EMail: info@crmonce.com
 |
| Phone Number: +91 9493916112,+91 8096556344 |
| Whatsapp: +91 9493916112 |
| Skype for Business: umamahesh@crmonce.com |
Upcoming Sessions
| Dynamics365 CRM |
| D365 CRM Portals/Adxstudio |
| CRM Advanced Programming with Azure Integrations |
| RESCO MOBILE Development |